Installing and Securing FileZilla FTP on your Windows VPS
You have this new, fresh, shiny Windows VPS (or dedicated!) with HostMySite. You need to install an FTP server, but where do you start? Do you want to configure the troublesome Microsoft FTP server, or get something up that is free, quick, secure, and easy? Well here you have it, this article is JUST for you!
What is FileZilla? FileZilla is well known for their amazing cross-platform FTP/SFTP/FTPS client for Linux, Windows, and OSX. This software is 100% free and open source. While we do recommend this software, we are not focusing on the client but rather the FileZilla Server – an easy-to-use alternative to Microsoft FTP Server, or other costly FTP servers. We will be focusing on installation, but mainly locking down your FileZilla service to prevent authorized access to your server.
Installing your own copy of FileZilla Server
Installing FileZilla is fairly straight forward and easy. The download page is located here. After you download and run the installer, you will need to install the following services:
- FileZilla Server (service)
- Administration Interface
Both services are required for FileZilla server to operate properly. Keep hitting next until the installation is completed. Once installed, you should be prompted with a “Connect to server” screen. Connect to the server… annnnd congratulations, FileZilla FTP server is now installed. Let’s lock it down!
Securing your FileZilla Server Installation
Microsoft Windows is a multi-user environment. By default, you are logged in as the Administrator which allows access to everything on the file system. The FileZilla Server installation, by default, is running as a SYSTEM user which allows full access to everything on the server. As you can imagine, this is not ideal from a security standpoint. We are going to configure FileZilla to run under its own limited user account. If the server gets compromised, the “hacker” can only damage what FileZilla has access to, not the entire server.
Before we get started, we need to give a fair warning – this is considered an advanced topic and incorrectly setting permissions can cause serious issues with your Windows installation. If you are not familiar with managing permissions, we suggest contacting your developer or administrator for assistance. We are not responsible for damage done to your own system.
Step 1: Adding a new Windows User
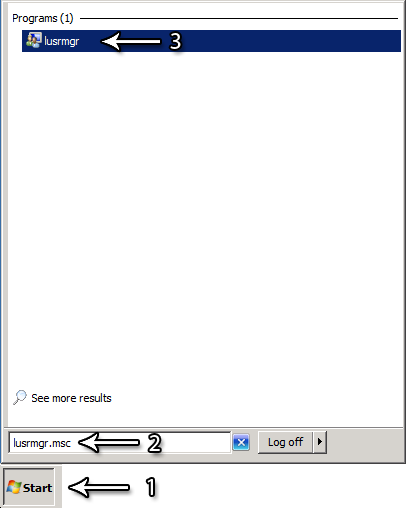
The first step we need to complete is adding our Windows User. To do this, click the Start button and type lusrmgr.msc in the search box. Click Users, in the center of the screen, right click -> New User. Enter the information (or customize as needed):
Username: FileZilla
Full name: FileZilla Service User
Description: Service user account for FileZilla Server.
Password: enter a strong password*
User must change password at next logon: UNCHECKED
User cannot change password: CHECKED
Password never expires: CHECKED
Account is disabled: UNCHECKED
*DO NOT COME UP WITH A SIMPLE PASSWORD. This should be a very long, complex password. You can use a free online password generator (http://generates.pw) to generate the password. You do not need to memorize the password, you will only need to use the password ONE time. Be sure to save the password for the next step.
Step 2: Reconfiguring the service
After adding your new FileZilla service user, we will need reconfigure the service to run as this user. First, click the start button and type services.msc.
Scroll down until you see FileZilla FTP server, right click, and select Properties. Under the general tab click “Stop”. After you stop the service, click the Log On tab and select This Account. Click the Browse button.
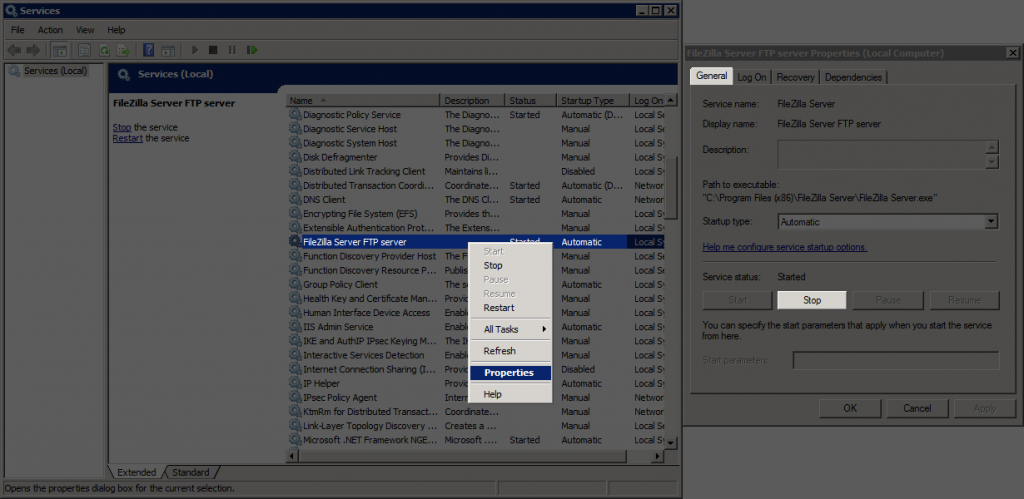
Type FileZilla and click Check Names. It should come up with MACHINENAME\FileZilla. Hit OK, and enter the password you created for this user account. You can now disregard the password you generated, you should no longer need to use it. Do not start the service. You will do this later.
Step 3: Configure Permissions for FileZilla
Minimize the services window, and browse to the FileZilla Server installation directory (default: C:\Program Files (x86)\Filezilla Server). You will need to add permissions to FileZilla Server.xml and FileZilla Server Interface.xml. To do this, right click on the file and select Properties. Click the Security tab, click edit, and then Add. Enter FileZilla as the username, and click Check Names. Click OK, select the FileZilla user and check Write underneath Allow. Click OK two times. You will need to repeat this to on both files. If you are going to log everything, you will need to create a folder called Logs and repeat the above steps.
Final Step: Finish applying steps
Now that the service is configured, we can go ahead and restart the service – this window should be minimized, or you need to access services.msc again. Once you setup your users in FileZilla, your users can’t write to the folder they are given permissions to. Where ever you point your FileZilla FTP user too, you will need to give the FileZilla service user Full Control which will allow users to modify, delete, write, and manipulate the file system in the way it needs.
If all your websites are located in a folder (for example) such as C:\Websites, you will need to provide the Websites folder FULL CONTROL to the FileZilla user. To ensure that everything is propagated to all the sub directories, right click on the root folder and click Properties. Select the Security tab and click Advanced. Depending on your operating system, you will need to select “Replace all child object permission entries with inheritable permission entries from this object”. This will propagate the user across all your sub directories.
Apply this trick to other services
While this guide is tailored for FileZilla Server, this trick can be applied to many other services. You should never run any service (unless it is an actual system service) as SYSTEM or ADMINISTRATOR. In most cases, services such as SmarterMail, MSSQL, MySQL, Coldfusion, and so on can run as their own service. If a “hacker” gains access to your server via one of these services (should it be a misconfiguration, exploit in the software, etc), they will be limited to only the service directory. If the service is running as system, the attacker now has access to ALL of your system files. Cleaning up damage from one service is much easier than cleaning up your entire server!
 Guest Blogger – Thomas Mack
Thomas is a Jr. Platform Administrator and has been with HostMySite for 2 years. He has been working on a game engine project for the past year and teaching himself about game coding. Thomas codes in ASP.NET, C#, HTML5, Java, C/C++, and actively works with DirectX. When Thomas isn’t working on his game, or assisting customers, he can be found offroading in his jeep!